⏱️ Timeline Animation
Timeline animation is used to manage how component properties change over time. You can define animation tracks and keyframes in the timeline editor, then trigger playback at runtime through the event system.
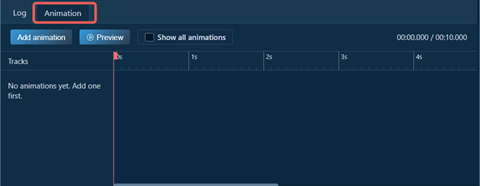
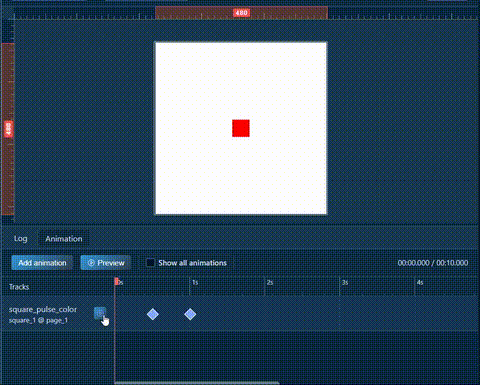
📍 Entry Location
- In the workspace main view, look at the bottom tab bar
- Click the "Animation" tab (to the right of the "Log" tab)
- After opening the Timeline Animation editor, create an animation and select a preview test component
1. 🔑 Key Concepts
Animation
- An animation is an independent track that includes a name, test component, and multiple keyframes.
- A project can contain multiple animations, and you can choose which one to trigger in events.
Keyframe
- A keyframe represents the target state at a specific timestamp (ms).
- At least one keyframe can create a visible transition (from current/initial state to that keyframe). Multiple keyframes can define richer continuous changes.
Property State
- Each keyframe can include selected properties participating in animation (such as
width,height,bg_color,opa). - Unselected properties will not participate in keyframe calculation.
Read Component State
- Read writes the current state of the preview test component into the selected properties of the current keyframe.
- This is useful when you first adjust the component to the target look on canvas, then write it back to the keyframe in one click.
- It is recommended to select the properties first before reading, to avoid overriding unrelated fields.
Easing
- Easing controls the speed curve when a property transitions from the previous keyframe to the current keyframe.
- Common types include: linear, ease in, ease out, ease in out, overshoot, bounce.
Preview Test Component vs Trigger Target Component
- Preview test component: only used for preview in the editor.
- Trigger target component: the component that actually runs the animation at runtime, configured in the Trigger Animation event.
- They can be the same, or different (for example, reusing one animation template for multiple components).
2. 🧪 Example: Square Scales Up, Then Changes from Red to Blue
The following example creates a square animation that scales from 50x50 to 100x100, then changes from red to blue.
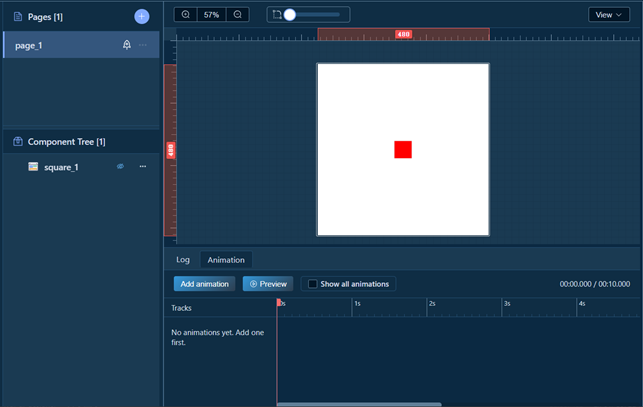
Step 1: Prepare a Test Component
- Add a container component on canvas.
- Set initial size to
50 x 50and initial color to red. - Name the component (example:
square_1) for later event targeting.
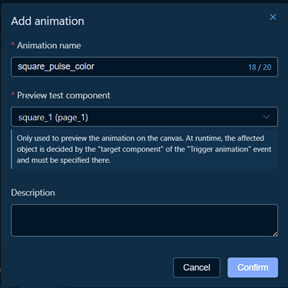
Step 2: Create an Animation Track
- Open Timeline Animation.
- Click "Add Animation".
- Set animation name to
square_pulse_color. - Select
square_1as the preview test component.
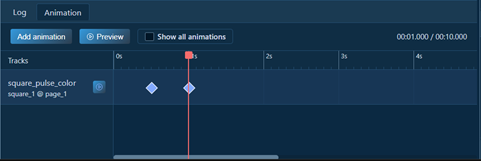
Step 3: Add Keyframes
This example only needs 2 keyframes (initial state uses the current component state directly, so no extra initial keyframe is needed):
500ms: complete scaling (100 x 100), keep red color1000ms: keep size at100 x 100, and transition color from red to blue
Step 4: Configure Keyframe Properties
Keyframe A (500ms)
width = 100height = 100bg_color = red
Keyframe B (1000ms)
width = 100height = 100bg_color = blue
Suggested easing:
- To
500ms, use ease out
Step 5: Preview and Fine-tune
- Click "Preview" to play the animation.
- Check whether the sequence "scale first, then color change" matches expectations.
3. 🎯 How to Trigger Animation on Screen Load
After defining timeline animation, trigger it through the event system.
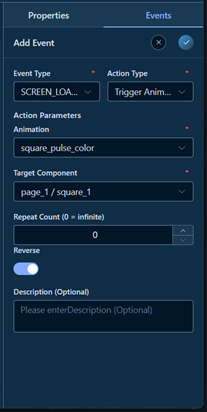
Step 1: Select Screen (Page) as Trigger Source
- Back in workspace, select the root node (screen) of the current page in the component tree.
- Switch to the Events tab in the properties panel.
Step 2: Add Event and Choose Action
- Click "Add Event".
- Set event type to
LV_EVENT_SCREEN_LOADED(triggered when page loading is complete). - Set action type to "Trigger Animation".
Step 3: Configure Trigger Animation Parameters
- Animation: select
square_pulse_color - Target Component: select
square_1 - Repeat Count:
1means play once0means infinite loop- Reverse: enable as needed (for reverse playback)
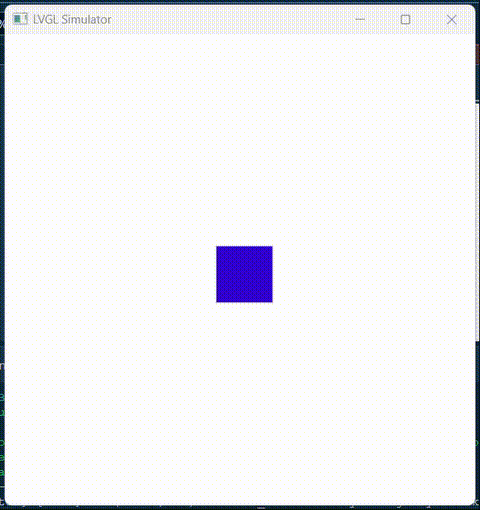
Step 4: Validate Runtime Result
- Save project and run preview.
- After page load completes, check whether animation starts automatically.
- Confirm
square_1executes "scale first, then change from red to blue" according to timeline.
🔗 Related Features
- Event System - configure trigger animation events
- Properties Panel - view and adjust base component properties
- Canvas Area - view the bottom tab bar and switch to the Animation tab
Workspace Documentation: ← Back to Workspace | Canvas | Components | Tree | Properties | Events | I18n | Timeline Animation | Toolbar | Shortcuts