AI Design
AI Design lets you describe UI requirements in natural language using Cursor, Codex, TRAE, or TRAE CN. The AI modifies the canvas in Beken LVGL UI Designer through MCP tools, without placing every component manually.
📍 Entry Point
- Open a project and enter the workspace in Designer
- Click the 「AI Design」 button on the toolbar
- Choose Cursor, Codex, TRAE, or TRAE CN from the dropdown (the corresponding AI tool must be installed on your computer)
The dropdown shows whether each AI tool is installed.
🚀 First-Time Setup
When you launch from AI Design for the first time, Designer checks whether MCP and Skill are installed and up to date:
| Component | Purpose |
|---|---|
| MCP | Writes global configuration into the AI tool so it can call Designer APIs for pages, components, properties, and more |
| Skill | Copies guidance into the AI tool's global Skill directory so the AI knows how to design UI in your project |
After setup, the AI tool opens the .ai-workspace folder under the current project directory.
Verify MCP Is Loaded
| How to check | Expected result |
|---|---|
| Cursor / Codex: Settings → MCP | beken_lvgl_ui_designer is listed and connected |
| TRAE / TRAE CN: MCP configuration | beken_lvgl_ui_designer is registered and connected |
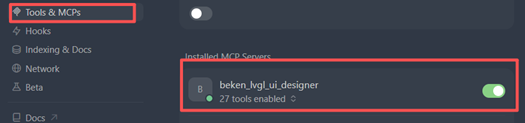
If MCP is not loaded: fully quit Cursor, Codex, TRAE, or TRAE CN, then reopen from the Designer toolbar AI Design entry. Do not open another folder or a path other than the project's .ai-workspace manually.
Global AI Settings
In Settings → AI Settings you can:
- Check Bridge status
- View MCP / Skill install status and versions for each AI tool
- Install, update, or uninstall the AI design environment
After installing or uninstalling MCP / Skill, fully quit the AI tool and reopen it from AI Design.
Manual Setup For Other AI Editors
If your AI editor does not appear in Designer's AI Design dropdown, but it supports MCP and Skills, you can configure it manually.
For Cursor / Codex / TRAE / TRAE CN, prefer launching from AI Design or installing from Settings → AI Settings. Use this manual setup only when automatic installation is unavailable or when you need to inspect the configuration. The application directory already includes MCP and Skill files, so no extra download is required.
First find the Beken LVGL UI Designer application directory. MCP and Skill are both under its resources folder.
MCP script:
<Application Directory>\resources\mcp\lvgl-ui-designer-mcp.cjs
Skill directory:
<Application Directory>\resources\ai-skill\beken-lvgl-ui-designer
1. Configure MCP
Add beken_lvgl_ui_designer to your AI editor's MCP configuration file. The configuration file location differs by editor, so check your editor's documentation.
Common configuration paths:
Cursor:
C:\Users\<username>\.cursor\mcp.json
TRAE:
C:\Users\<username>\AppData\Roaming\Trae\User\mcp.json
TRAE CN:
C:\Users\<username>\AppData\Roaming\Trae CN\User\mcp.json
Codex:
C:\Users\<username>\.codex\config.toml
If the configuration file already has other MCP servers, Cursor / TRAE only merge the mcpServers.beken_lvgl_ui_designer entry. Codex only merges the [mcp_servers.beken_lvgl_ui_designer] table. Do not overwrite other configuration.
{
  "mcpServers": {
    "beken_lvgl_ui_designer": {
      "type": "stdio",
      "command": "<Application Directory>\\LVGL-UI-Designer.exe",
      "args": [
        "<Application Directory>\\resources\\mcp\\lvgl-ui-designer-mcp.cjs"
      ],
      "env": {
        "ELECTRON_RUN_AS_NODE": "1",
        "LVGL_DESIGNER_BRIDGE": "http://127.0.0.1:39001"
      }
    }
  }
}
Replace command with the path to LVGL-UI-Designer.exe in the application directory, and replace the args path with resources\mcp\lvgl-ui-designer-mcp.cjs under the same directory. The packaged app uses its own runtime to start MCP, so Node.js does not need to be installed separately.
2. Install Skill
Copy the full Skill directory from the application directory into your AI editor's Skill directory. The Skill directory location differs by editor, so check your editor's documentation.
Common directory examples:
Cursor:
From:
<Application Directory>\resources\ai-skill\beken-lvgl-ui-designer

To:
C:\Users\<username>\.cursor\skills\beken-lvgl-ui-designer
Codex:
From:
<Application Directory>\resources\ai-skill\beken-lvgl-ui-designer

To:
C:\Users\<username>\.codex\skills\beken-lvgl-ui-designer
TRAE:
From:
<Application Directory>\resources\ai-skill\beken-lvgl-ui-designer

To:
C:\Users\<username>\.trae\skills\beken-lvgl-ui-designer
TRAE CN:
C:\Users\<username>\.trae-cn\skills\beken-lvgl-ui-designer
Copy the entire Skill directory. Do not copy only
SKILL.md.
3. Restart And Verify
After configuring MCP and copying the Skill, fully quit the AI editor and open it again. Then start Designer, open a project, enter the workspace, and confirm that beken_lvgl_ui_designer is connected in the AI editor's MCP page.
💬 How to Design with AI
1. Launch the AI Tool
Choose an installed AI tool from AI Design on the toolbar. Designer ensures MCP / Skill are ready and opens that project's .ai-workspace.
2. Describe Requirements in Chat
Describe the UI change you want, as you would to a design assistant. Example:
Turn the home page into a device status panel: title at the top, temperature and humidity in the middle, three action buttons at the bottom.
Tips:
- Name the page, layout, and content for each area
- Add colors, font sizes, spacing, and other visual details when needed
- Make one clear change at a time, review the result, then continue
- Import images or fonts through the resource manager before asking the AI to use them
3. Watch Canvas Feedback
While the AI talks to Designer through MCP, the canvas shows feedback:
| Phase | Canvas behavior |
|---|---|
| Read / analyze | Scan animation with "AI smart analysis in progress..." |
| Write / modify | Animated border around the canvas while changes are applied |
4. Confirm or Roll Back Changes
When a round of AI edits finishes, Save and Rollback appear at the bottom of the canvas:
- Save — accept this round of AI changes and add them to undo history
- Rollback — restore the state before this round started
- If you edit manually or start a new AI conversation without choosing, pending changes are saved automatically
✅ Supported Capabilities
Through MCP, the AI can typically:
- Read project summary, page list, and component tree
- Create, delete, and move components
- Update component properties and styles
- Create or switch pages
Some advanced features (complex event chains, fine-grained timeline animation tuning, etc.) may not be supported yet. The AI should explain limits; you can finish those parts manually.
❓ FAQ
| Issue | What to do |
|---|---|
| AI Design button is disabled | C or MicroPython preview / compile / run is active. Stop it and try again. |
| Dropdown shows "Not installed" | Cursor, Codex, TRAE, or TRAE CN is not installed. Install the AI tool first. |
| Cannot modify UI / no project open | Open a project and enter the workspace in Designer, then launch from AI Design. |
| Not in workspace | Enter the project workspace from the home page; do not stay on the project list. |
| Workspace mismatch | The AI chat folder is not this project's .ai-workspace. Quit the AI tool and reopen the current project from Designer AI Design. Do not switch folders or open another project manually. |
| MCP commands fail in the terminal | MCP runs inside the AI tool, not in the shell. Reload by launching again from AI Design. |
| Still broken after MCP install or update | Fully quit Cursor, Codex, TRAE, or TRAE CN and reopen from AI Design, or uninstall and reinstall MCP under Settings → AI Settings. |
| AI result is not what you wanted | Click Rollback and retry with a more specific prompt (page name, layout, component types, colors). Prefer small steps. |
| Bridge status is abnormal | Click Refresh under Settings → AI Settings and ensure Bridge is running. |
💡 Best Practices
- Always launch from Designer — keep Designer and the AI tool on the same project
- Stay in the workspace — MCP edits require Designer to be on the workspace screen
- Iterate in small steps — one clear goal per request, then review
- Combine with manual editing — use the properties panel, event system, and other tools for complex interactions, animation, and i18n
- Save the project when it matters — confirmed AI edits join undo history;
🔗 Related Topics
- Toolbar — AI Design entry
- Canvas — preview AI changes and the confirm bar
- Component Library — available component types
Workspace Documentation: ← Back to Workspace | Canvas | Components | Tree | Properties | Events | I18n | Timeline Animation | AI Design | Toolbar | Shortcuts